Tuesday, October 2, 2012

Around and Around We Go

I must say that Day 3 of learning to spin on my new drop spindle was much easier (and WAY more productive) than Days 1 or 2, lol!  Even though I still ended up with a heavy worsted/light bulky weight yarn; it was something I could live with.  The very helpful man at Pacific Wool and Fiber suggested I start out with some Corriedale Cross Wool Top  (which was very affordable at about $9.00 for 8 oz), and after fiddling around and watching YouTube videos for a couple days, I was able to successfully take this:


To a couple 100 yard balls of these singles:


And then ply them together with my spindle into 100 yards of this; my very first handspun!


I got about 11 wraps per inch, indicating that is most likely a heavy worsted or a light bulky... but what to make out of this precious yarn?  Well, first it needed a bath through the dyepot to turn it into this:


and now it screams "HAT" at me... I'm thinking this one (free on Ravelry):


Man Hat Pattern by Haven Leavitt


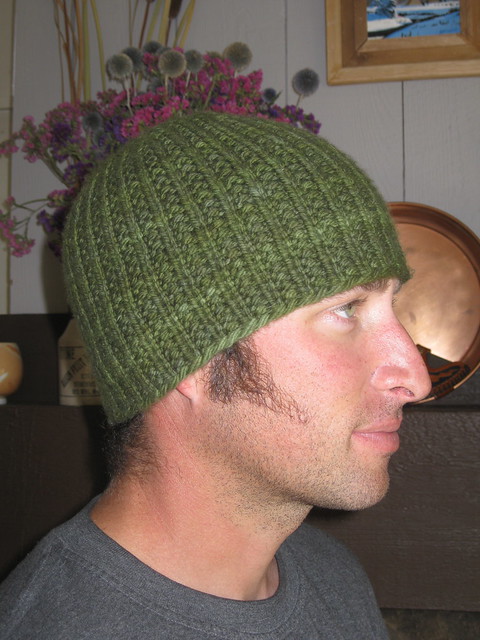
And now, a couple weeks later, we have, "The Not So Manly Hat" modeled by my lovely recipient :)


Tuesday, September 25, 2012

Got Yarn?

I needed yet another project bag idea for a kitty lover... and found this adorable pattern by Shiny Happy World (click on the picture to order your own copy of the pattern):

Image of Cats embroidery pattern PDF
Pattern & Picture by Shiny Happy World

I traced the four kitties onto a square of muslin, backed by fusible fleece (to add padding to my finished bag, and hide those pesky embroidery tails) and added a little slogan to the bottom as well :)


I topped it off with some kitty backing fabric, a cute pink polka dot interior, snapping yarn guide, padded handle, and top zipper.
 

You can see the snapping yarn guide here... basically it is just a strip of finished fabric with two of my favorite kinds of snaps (using my snap press) so that you can place your project yarn through the snapped loop, and keep your yarn ball from pulling out of your bag at an inopportune moment (like... in the middle of your bus ride, lol).  The snap means that you can change out your project at will without having to snip your yarn.  It also works really well to keep your scissors handy, or to put a safety pin of stitch markers, etc on.


Here's a peek at some of the other goodies I included in this swap package (I might need to make one of these for myself someday!)


Monday, September 24, 2012

A New Home for My Needles....

If you are like me... and own a set of KnitPicks Interchangeable circulars....

Options Interchangeable Nickel Plated Circular Knitting Needle Set by Knit Picks
Picture from Knitpicks.com
then your set is probably still housed in the little cardboard/elastic board it came with, lol!  I have tried several different storage systems (and I have some lovely needle rolls that can house ALL of my collection).... but they just weren't working for taking the show on the road, if you know what I mean.
Here is my criteria:
    *  It needs to be fairly small and compact.  And by that I mean that it must fit into a smallish size project bag, or even in my purse in a pinch. 
*  It needs to hold all 9 of the needles, the cables, the stitch holders, a small pair of scissors, a needle sizer, and (dreamin) all of my bamboo dpn's as well...

*  No ties.  Ties are fumbly, and impossible to do with one hand.  It needs to be an easy, secure close, without lots of rolling.
    I know, I know.. sound like a long list, doesn't it?  However, I've been knitting long enough now that I have a good idea of what I would love.  Sooooo...  I did a little internet searching, and looking, and decided to try my hand at making my own. 


Directions:
Cut 2 pieces out of the outer fabric (17 x 6.5") as well as a piece of fusible fleece the same size.
Cut 1 piece of inner pocket fabric (15.5 x 6.5") and 1 piece (10.5 x 6.5")
Cut one piece of 1/4" stretchy elastic (for the tie) at 8.5"

Fuse the fleece to the wrong side of one of the outer fabric pieces.  Fold each of the inner pocket pieces & press (wrong sides together, to make 6.5" wide pieces). On the smaller piece, mark the stitching lines that will hold the interchangeable needles.  I marked the center of the fabric with a line, and then marked two 1"spaces to the right of the center line (to hold the larger needles, and still leave 1/4" seam allowance) and two 3/4"spaces, and two 1/2" spaces to the left of the center line to hold the smaller needles.

 
Layer this piece on top of the other inner, unfolded pocket piece  - the raw edges should line up at the bottom - and stitch all of the marked stitching lines EXCEPT the center line.  This is important, because if you don't unfold the larger piece to do the stitching, you won't have deep enough pockets for all of the cables, etc that you will want to include (ask me how I know this... seam rippers are our friends!)  The reason you don't stitch the center line yet is because that line holds the pocket pieces to the inner case piece to hold everything secure and form the second set of deep pockets :)


Fold the large pocket in half on the center fold line (see the above diagram), and then layer it on top of the right side of the piece of outer fabric that is NOT fused to the fleece.  The raw edges should all align at the bottom, and then stitch the center stitching line through all layers, until you come to the end of the inner pocket pieces.  This is the completed inner piece :)  Base the piece of elastic for the closure about 1/2 way up on the right hand side (raw edges should all align).  To finish, layer the outer fabrics (right sides together) and sew with a 1/4" seam all the way around, leaving a 3" gap at the top of the two pieces for turning (and making sure to backstitch over the enclosed elastic a couple of times for security). Turn the needle case right side out through the hole that you left, press, and blind stitch (or topstitch) the opening closed.  Ta-Dah!  A completed needle case!

Here is my prototype:


To close your needle case:  Simply fold the top flap down, and then fold the whole thing in half, and secure with the elastic.  A compact, fully functional case that will hold your needles, cables, notions, and even your dpns... and still fit in your purse!  The needlecase below (folded) is about 3" x 8", and fits into all of my project bags :)


So now... hopefully your interchangeable needle set can be snug and secure in a new home (it only took mine about a year, lol!)

Wednesday, September 19, 2012

Here Kitty, Kitty!

More stitchery... a darling little kitty this time, that I decided to feature on the project bag for a kitty lover.  I found this free embroidery pattern at Hudson's Holidays (click on the picture to go to her website and download it for yourself):

 
I traced it with a sharp pencil onto some quality muslin, and then embroidered all of the lines with backstitch, the circles with satin stitch, and the butterfly antennae with french knots.  Here is a great resource if you need a refresher on any of these stitches!
 
I added some fabric strips in a kitty themed fabric print & a cheerful bright pink polka-dot.... added a zipper with a ribbon pull, some interior padding to keep those needles and hooks safe, and an interior snapping yarn guide to keep project yarn from tangling.  I also squared off the bottom to help the bag stand on it's own.  This cute little bag seemed to cry out for a interior pocket... and I added one with a coordinating kitty print topper, and a snap to keep it shut.  Here's my finished item:
 
 
As well as a shot of the interior (with pocket and snapping yarn guide):


and a shot of all of the other goodies I sent to my recipient (little projects to make and try!):


I hope she enjoys her one-of-a-kind swap package as much as I enjoyed putting it together!  Incidentally, I have a new picture logo for my blog:
 
 
Love that little hen :).  Have a great weekend!


Friday, September 14, 2012

Baa Baa Black Sheep

Yet another hand-embroidered project bag.. but this time with a sheepy theme!  A sheep picture, some added font work with photoshop, and Ta-Dah!  A new embroidery pattern to follow:


I also knew that I wanted some sheepy fabrics to complement my bag... but I couldn't find anything online or at the store that was just perfect... so I went with a fabric that is reminiscent of wool locks on a black background.  This little project bag features a zipper closure, inner snapping yarn guide (so you can switch out projects at will), and a squared off bottom so that it will stand up on its own.  I didn't use a pattern, but instead let the size of the embroidered piece, and the length of the zipper dictate the finished size (living dangerously, I know!)  Here is my finished bag:


Since this bag was going to be part of a knitting swap package featuring a Teeny Tiny handmade.. I had another quandry.  What to make?  I love this pattern by Little Cotton Rabbits (and have adapted it for all sorts of creatures, including a bee, and a cat).... could I knit a sheep?  After adapting the ears, and moving them slightly down the head and adding some yarn curls up top... I had my finished items!  (However, my husband still asked me, "Ummmm... are those puppies?"  But... what are you going to do, lol?)  Meet "Purl" and "Curly":


Here is the rest of my swap package, including some mini-skeins, some sheepy little tags and a new set of darning needles.  Hope it puts a smile on my recipient's face!


Friday, September 7, 2012

Heathered Fallberry Mitts

Autumn is coming here to the Pacific Northwest... and the season of Christmas knitting is fast approaching!  I stumbled upon this lovely, free pattern from Knitty, "Fallberry Mitts by Anne Hanson" and I have been hankering to try some more dyeing......


I have quite a bit of the soft cream Wool/Acrylic/Nylon mix that I unravelled from a thrift store sweater... and that I used for this sweet little bunny. 


So, before starting this project, I attempted dyeing my yarn a nice, deep purple using McCormick's neon food dyes, and a steaming pot full and vinegar and water.  This is what I got, after washing and drying the yarn:
 
 
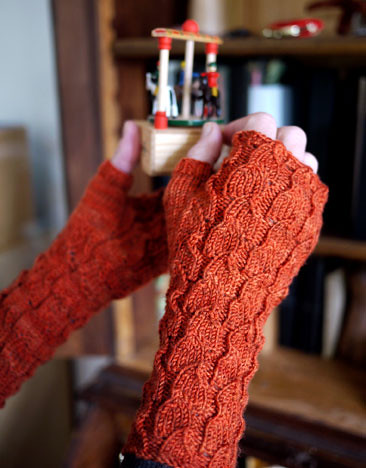
Nice... but not quite what I was going for.  Sooo.... after finishing the second mitt, I sent them both through the dyepot one more time (with a couple packets of red Kool-Aid, and several drops of neon blue food coloring).  This time I let the mitts soak for several hours in the steaming dye while I slowly increased the acidity of the bath by adding subsequent amounts of vinegar.  All of my hard work paid off, though, with these beauties: My Fallberry Mitts


Good News!


I have some news :) I just found out that the 2 projects I submitted to the Martha Stewart’s Craft Challenge waaaay back in February…. both won!
I’m listed as Carrie H from Oregon…. I’m one of the first place winners for “Katie’s Mini-Chic”


and one of the 2nd place winners for my “Wee Ones”….. woo-hoo :)

I win a Martha Stewart CraftsTM Knit & Weave Loom Kit,


and a 1 yr subscription to Martha Stewart Living Magazine… what a nice suprise for a hectic day :)