Thursday, September 17, 2009

Altered Journal

My niece has an upcoming birthday, and she only had one request ... there MUST be a unicorn. Soooo... I used {Cassidy} by Miss Tiina & Faith True and Mod Podge to cover a composition notebook and a pencil for her "private journal", lol!


First, I scanned in the composition notebook cover so that I could get a rough idea of my design size. Then I printed out a front and back cover (the back cover had an extra piece for covering my pencil) on Kodak Photo Paper (Gloss) and spread a thin layer of Mod Podge over each piece with a foam tool. That only took about 5 minutes to dry, and then I spread a thicker layer of Mod Podge on the front of the composition notebook.


I trimmed the left hand side of my front piece (for a straight edge where it would meet the binding) and then adhered my page. I rolled out any potential air bubbles with my rolling pin (I'm sure a brayer would have worked just as well, but I didn't have one, lol!). I then let it dry for a couple of minutes, flipped it over, and trimmed off the excess with a craft knife. I also sanded the edges and applied another coat of Mod Podge (especially where the front design met the binding). I then repeated the process with the back design (for the back design, you must trim the RIGHT side of the design paper, however!!)

The pencil was very easy as well. Cut a strip of paper that is 1″ by the length of your pencil before it’s sharpened. My pencils were 7″ long. Brush Mod Podge on the strip of paper. Lay pencil on one edge of paper, and then with clean fingers smooth down by rotating the pencil. You can roll on a flat surface to make sure paper is adhered. Brush a little Mod Podge under edge of paper if needed. Let dry 1/2 hour before sharpening pencils.

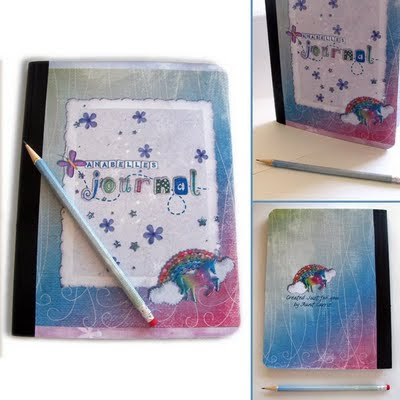
Here's my finished project:

Thursday, September 10, 2009

Mini Hybrid Gift

While I was waiting in line at Safeway today, I just happened to catch site of the olive bar... and those cute little olive containers. I took one right home and came up with this:


I made the labels for the Hershey Miniatures as described below in my previous post, and I measured the lid, and added a 4" circle with my shapes tool in PSE. I also printed out some additional decorative elements using {Sweetness} by Purple Colourz so that I could add some dimensionality to the lid. Here's a screen shot of what I ended up printing (includes 12 wrappers)


I adhered the printed circle to my lid using my Pioneer Extra Strong Embellishment Glue stick (I love this gluestick... works on anything) and then added a sheer ribbon bow, a couple of matching buttons, and the top cupcake (with foam dots)... I packed the chocolates in the tub with some paper shreds, and presto... a hostess gift for my sister-in-law! Here's the kit I used from FPD:

Hybrid Goodness

I’ll admit it … I have a weakness for chocolate, and I think that it makes the perfect gift! I wanted to dress up some Hershey's miniatures as a gift for my hubby's grandmother.


Here’s what I used to get started:


I started by creating labels to wrap around my miniatures. I opened a new 8 1/2 x 11 inch document in Photoshop Elements and created a template for my miniature wrappers. Then I had fun choosing my papers and embellishments from the collab kit {Mod Garden}. After creating each label, I merged it down, and copied it three times (for a total of 12 labels) Here’s a screenshot:

I decided to use my circle element to create a tag to attach to my bag, as well as a crocheted flower from the kit. After printing and cutting out all of my pieces I wrapped each miniature (securing with my Pioneer extra strong glue stick). Then I dressed up my circle design that would be the highlight on the top of my bag. First I adhered it to a slightly larger cardstock circle, and then placed my flower on with a pop-dot. I stuffed the bag with my wrapped nuggets, and some cream shredded paper, and then attached my tag with some coordinating ribbons.

Here's a template (in .psd form) if you want to whip up your own wrappers! Enjoy!


Tuesday, September 8, 2009

Party Favors

My niece has an upcoming birthday, and she only had one request for her invitations and favors... there MUST be a unicorn. Soooo... I used {Cassidy} by Miss Tiina & Faith True, and came up with these:
{Cassidy}


Invitations:

Sucker Wrappers:

Candy Pockets (fits a fun size M&M packet perfectly):


and here is a template that I made for the sucker wrappers, and for the candy pockets so that you can make your own party favors!