Tuesday, February 25, 2014

Scrappy Work

I'll just come out and admit it.... I'm a sockaholic.  Really, the only reason I learned how to knit is so I could make socks.  And while I have branched out a bit in my obsession (I mean.. I make sweaters, hats, and mittens too)..... really?  It's all about the socks.
 
However, this leads to another dilemma.  After you cast-off your handmade work of art for your feet, there is ALWAYS a bit of leftover yarn.  And not just a little yarn, either.... enough that you would feel very guilty throwing it away (especially now that I find myself preferring the "good stuff").  What to do? 
 
Well, I have finally hit upon the solution.  Scrappy.... everything.  I think when most people think scrappy... they think things like "Obvious Colorbreaks... and Clashing Colors".  Not so!  A little blending goes a long way, and takes those scraps from something guilt-ridden to something fabulous!
 
I normally cast on with just one color and knit with it for a while.. and then start striping with my other scraps at odd intervals (2 rows one color, 1 row of another, 2 rows same color, 3 rows of another), carrying my yarn strands up the side in an inconspicious spot (NOT in the bottom of the foot, lol!)  And I have fallen in love with the result.  Not only does my pocketbook thank for me for using up all of those pricey little bits, I just love the colorful outcome.  Check out these scrappy beauties, using the Turkish Bed Socks pattern by Churchmouse Yarns and Teas:
 
This first pair uses up three different variagated pink yarn scraps:
 

And this pair uses some of those SAME pink scraps, along with FOUR other different yarns:


The key is in the blending.  I know some of you are shaking your heads right now and saying something like... "But what about all of the ENDS you will have to weave in?"  Oh no... remember?  After you add in your next yarn, you just keep carrying it up the side.  This means that you really shouldn't go more than 2-3 rows with the same color, so you don't have large "floats" inside... but, it's just not as bad as you think :)
 
Here's some more examples; these ones have a bit more obvious color striping.. but only because that was the effect I was going for...


 And these are just slippers... what about using up odds and ends for an entire, adult length sock?  These are my hubby's very favorite pair at the moment (with more skeins that I can count)...


And I just finished up these "Blended Vanilla Latte Socks" for a dear friend :)


So, give it a try!  Break out all of your scraps, and cast on :)  I bet you will love the result!


Friday, February 21, 2014

Time for a Cuppa?

Nothing kicks me into high gear like an upcoming swap on Ravelry!  (By the way... if you knit or crochet.. and you don't know what Ravelry is, you need to head on over and check it out!!!)  Crafty-wise... there is nothing I like more than to sew/knit/craft the perfect package to send out to my swap partner.
 
The "Just Add Water" swap in the Ewe LaLa group on Ravelry was certainly no exception.  The idea was to come up with a tea-themed package that would delight its recipient :).  First... the tea cozy!  My swap partner's kitchen has touches of lime green... so I went with the reversible Emily Tea Cozy pattern in cream and lime green.  I knit the front and back pieces 2-at-a-time magic loop.  This is my very favorite way to knit something that has more than one identical piece, because you are assured that they are exactly the same size, and you only have to read the chart once!


Next, I knit up a sweet little dishcloth (also in lime green) using 100% cotton, with a cute teapot motif, "Tea Pot Dishcloth by Rachel van Schie"


Of course, I also included lots of other fun hand-mades, some yummy tea, and scrumptious yarn....


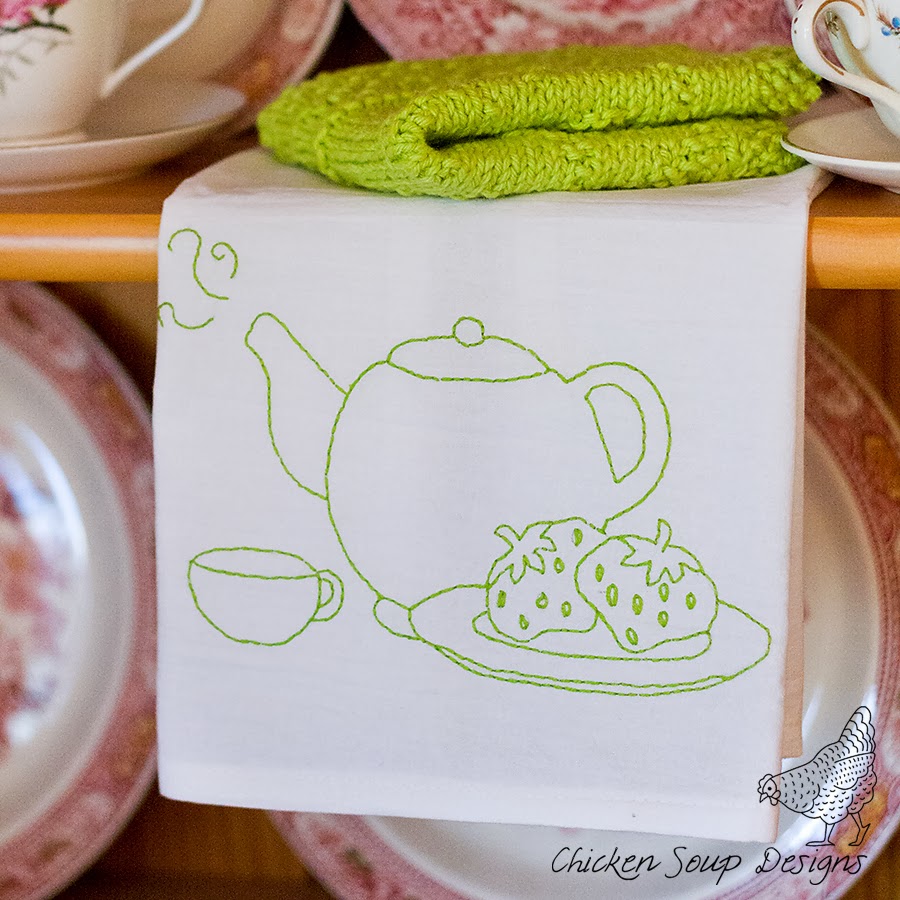
However, I think one my very favorite things to make was the embroidered tea towel :) (also in lime green, of course!). 


Just in case you would like to embroider your own sweet little tea party towel, I've included a link to my free pattern below (just click the picture).  Have a cuppa on me!
 
 
https://dl.dropboxusercontent.com/u/74477577/Strawberry%20Tea%20Embroidery%20Pattern.pdf


Monday, February 17, 2014

Hand-Dyed Mittens

The dyeing bug has struck again, but this time with my newly aquired acid dyes!  I received these for Christmas last year, but since I was only a couple of months pregnant I decided to hold off for a while.  But now the time has come!
 
 
I've never dyed with acid-dyes before (only food-safe dyes), so I decided to play it safe and use some worsted weight Fisherman's Wool for my first attempt.  I wanted a semi-solid purple.  I skeined it up, and soaked it in some tepid vinegar water while I mixed up my dyes and heated the dyebath.  I chose two complementary purple dyes (Plum 822 and Lilac 845), and measured out 1/2 teaspoon of each dye into 1 cup boiling water for the dyestock. 
 
I used about 1/2 cup of the Plum first... and then added the yarn to the simmering bath.  It soaked for about 20 minutes, and I then I turned the heat off and let it sit until the water was clear.  After rinsing the yarn, I carefully twisted the skein up and then added it back to the dyepot.  I poured a little of the Lilac 845 dyestock directly onto the skein, and then added 1/2 cup to the simmering water in the pot.  I let this simmer for about 20 minutes until the dye bath was once again clear.  After cooling, the yarn was rinsed, spun dry in my salad spinner and hung to dry overnight. 


But, what to knit from the finished yarn?  I decided to go with the "Classic Mittens by Bernhard Ulmann".  We had a HUGE (for us) snowstorm here in Western Oregon in the past couple weeks, and it became apparent just how many pairs of mittens we didn't have!  Here's my finished project:


Happy dyeing experiments of your own!

Tuesday, February 11, 2014

Valentine Squeak Kitchen Towel

One of my favorite ways to brighten up my kitchen is to add a new towel to my rack - especially a hand-embroidered one!  Dish towels make the perfect housewarming or wedding gift because they are so versatile and can be made to fit any kitchen. Best of all, the one I am sharing today whips up quickly; and what could be cuter than a sweet little mouse sending some love to his special "somebody"! 


I have a secret, though... when you buy a pack of flour sack towels, they are almost always enormous (33" x 38").  Standard kitchen towels are normally 25" x 14".  So, what I normally do is cut each flour sack towel in half, and re-hem them.  This gives me twice the number of towels for my money (and they fit better in my drawers!)

All you have to do is download the pattern below, and print it in the size you need.  Trace it onto your fabric with a disappearing ink pen or a pencil, and then embroider the design any-which-way you’d like.  I used backstitch for most of the design on my towel:


and lazy daisy stitch (sometimes called a "detached chain) for the flower leaves, and satin stitch for Mr. Squeak's eyes.  And there you have it ... the perfect gift for your special somebody!

 
Download your free pattern by clicking on the picture below:
 
https://dl.dropboxusercontent.com/u/74477577/Valentine%20Squeak%20Embroidery%20Pattern.pdf


Saturday, February 8, 2014

Sending A Little Love....

I adore Valentine's Day.... knitting, that is!  Every year, I tend to go a little overboard with my projects (and this year was certainly no exception).  And who can blame me?  Red & White, Pink & Red, Pink & White; they are all such great color combos. 
 
And what goes better with some Valentine's chocolate than coffee (and free Ravelry patterns)?  I used the Valentine Mug Cozy by Kristen TenDyke to knit up these little cozies - a perfect fit for the ubiquitous Starbucks travel cup.  I altered the pattern to be in-the-round, and fit a travel cup rather than a mug as follows: 
I cast on 54 stitches (2 sections of 19 for the colorwork hearts, and 2 sections of 8 for two cable portions), and I did three rows of k1p1 ribbing for the top and bottom parts. With a size 4 needle for me - perfect proportions for a travel mug cozy - in the round - so no need to do colorwork on the “WS” of the cozy, like with the flat version.


Click to see this project on Ravelry!

Click to see this project on Ravelry!
 
I also knit up this little cozy using the Java Love pattern by Diane Pearl Kostecki - so sweet!
 
Click to see this project on Ravelry!
 

And who couldn't use a couple more of these cute dishcloths for the kitchen?  I knit them 2-at-a-time so that I would only have to read the chart once (but get two dishcloths out of the deal!)  Heart Dishcloth Pattern by Emily Jagos


And to finish it off - some Valentine's Day Sewing, using my current favorite bag tutorial (Terri Ann's Sock Sack).  Once again, I do make some modifications.  I like my bags fully lined, as well as the pockets - so I have adapted the pattern for that ♥)
 
 
And then one of my own design - featuring an outer zippered pouch for notions, a squared off bottom for sitting upright, and a top zippered enclosure to keep your knitting safe and secure!


I also made some of these cute little lined zippered pouches, using the tutorial over at Jedi Craft Girl.


I hope this upcoming Valentine's Day inspires some sweet crafting of your own! 

Tuesday, February 4, 2014

Zippered Teacup Pouch


I've been sewing up some of these cute little teacup pouches, and I thought I would share a tutorial on how to make one of your own! If you have ever made a lined, zippered pouch, then this will be a piece of cake.  If you have never made a lined, zippered pouch... then I hope this will help!


Materials:
  • 3 Coordinating Fat Quarters
  • Scrap of muslin, felt or linen for tea bag embroidery
  • Small amount of embroidery floss
  • 9” zipper
  • Warm & Natural Cotton Batting
  • Sewing Thread
  • Desired Embellishments (ribbon, trim, etc)
  • Teacup templates (download link at the bottom of this post)

Cutting Directions: 
From each fat quarter, cut one strip 2” by 18” (3 strips total) and sew the strips together to make a piece that is approximately 5” by 18”.  Fold this piece in half lengthwise, and cut out two tea cup bodies (for OUTER front and OUTER back).  Choose one fat quarter to be the lining, and cut two more tea cup bodies to use as the inner lining (for INNER front and INNER back).  Using the handle pattern, cut one handle from your desired fabric.

From the cotton batting, cut two tea cup bodies, and one strip that is ¾” by 8½” to pad the handle.


Sewing Directions:  (All Seams are ¼”):
Place the front and back pieces onto the cotton batting pieces, and quilt as desired (i.e. stitch in the ditch between the 3 different fabrics).  This is also a good time to add any desired embellishments (ribbon, trim, etc). 
 

Fold the handle piece lengthwise, right sides together, and place the ¾” strip of cotton batting next to the fold.  Stitch along the raw edges, leaving one end open.  Turn right side out and press.


Start by placing the OUTER front face up. Then, along the upper width, place your zipper wrong size up and centered over the fabric.  Now take one of the INNER lining pieces, and lay it on top of the zipper and outer fabric. All three pieces (outer fabric, zipper, lining fabric) should align at the very top. You can pin if you prefer.  Sew the two fabric pieces to the zipper.  

 Now, do the same process to the other side of the zipper.  Place the zipper face down on the right side of the OUTER back fabric.  Line up the edges.  Layer the lining on top, right side down.  Pin, if desired, and sew the two fabric pieces to the zipper.
Open it out flat, press, and top stitch about 1/8" next to both sides of the zipper.  This will hold the fabric in place so that it won't catch in the zipper.  
 

Take the handle piece, and pin ONLY TO THE OUTER front face and NOT THE LINING.  Baste in place.

Unzip the zipper partway (This is a very important step!  Otherwise, you won’t be able to turn your bag right side out after it is sewn shut).  Pin the two lining pieces and the two outer pieces, right sides together (aligning seams, and pinching the zipper edges towards the lining).  Sew, ¼” from the edge, making sure not to stitch through the zipper stops (which will break your needle), and leaving a hole for turning at the top of the lining (flat base of the teacup). 


Clip corners to help the bag lay flat, and turn right side out through the hole left in the lining.  Use a chopstick or a blunt skewer to help push the corners out.  Topstitch close to the edge of the lining to close the hole.

Using the tea bag template, cut two pieces from muslin, linen, felt etc.  Sew these two pieces together with a scant ¼” seam, leaving a small hole for turning.  Turn right side out through the hole, and then topstitch close to the edge all the way around the bag.  Embroider the word “TEA” on the bag, and then attach to the bag front with a small length of embroidery floss. 
 
Get your teacup template by clicking on the picture below: 
https://dl.dropboxusercontent.com/u/74477577/Zippered%20Teacup%20Pouch.pdf


I hope you enjoy sewing these darling little pouches as much as I did!  Stuff them full of your favorite tea bags and send them to a friend to enjoy!