Thursday, January 10, 2013

Year in Review

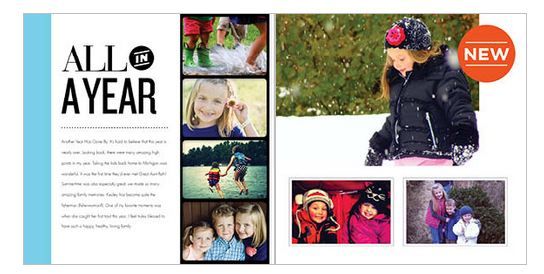
I received a 20$ credit from Shutterfly in my inbox this morning.. and what better way to spend it than on a "2012 Year In Review" photobook for our family?  I chose an 8x8, hardcover custom photobook path, called "All In A Year".


After uploading all of my photos to their website, and I just drag and dropped them into place, edited the text to reflect my family's year, and presto!  Our Family In Review, 2012!

                    Photo Book Tip: Create an adventurous travel photo album at Shutterfly.com.

Thursday, December 27, 2012

Oh the Weather Outside....

Nothing says winter to me than little socks, boots and mittens strewn across my kitchen floor.  This year, I upped the ante by completing not one... not two... but TEN pairs of fingerless/fingered gloves as Christmas presents for my family and loved ones.  I've also learned some things along the way, and I'm going to review the patterns I used for you here :)

Pattern #1:  Fallberry Mitts by Anne Hanson - This was my first time using this particular pattern, and I love the lacy, sophisticated result.  The thumb gusset came out spectacular, and her instructions on how to pick up the stitches for the thumb (which I didn’t follow for one glove, and strictly followed for the other) made a huge difference in that little gappy area you get when picking up the thumb on most fingerless mitts or mittens.The ONLY problem I had (which could be remedied by doing these mitts 2-at-a-time Magic Loop) is that it was easy to get lost in the middle of pattern, and end up with some "leaves" that were a tad bit taller than the others (which of course affects the finished length of th glove).  Therefore, the next time I make these beauties, I'm doing them 2-at-a-time to preserve my sanity!

Pattern #2:  Treads, a tipless gloves pattern by Victoria Anne Baker
This pattern introduced me to the Vikkel Braid (for which I will be forever grateful)... a lovely little piece of ornamentation that will be handy for all sorts of projects to come (once you figure it out, it is easy peasy!)  I also liked the variety of stitches that are used for these little mitts.  My first attempt (with a slight shortage of yarn) necessitated the amputation of the individual fingertips.. and the gloves themselves came out a tad loose (as noted by other Ravelers.. this pattern runs a little big).  My second attempt, with some lovely Malabrigo, ended with fingertips and all, and I was even happy with the size.  I could see making these again for those people in my life (you know who you are) who don't enjoy gloves that go halfway up their arm....

Pattern #3:  Vancouver Fog by Jen Balfour
There just isn't anything bad I can say about this pattern... I adore it.  From the complicated looking cabling (that just screams, "I AM A GOOD KNITTER", lol!) to the nice, stretchy cast on, and purl ridges on either side of the cabling that really pull these gloves in and give them a good fit.  I started off doing these mitts one at a time, but after the 2nd, or 3rd pair, I realized it would save a lot of time doing them 2-at-a-time.  I used the “cabling without a cable needle” technique that I learned from grumperina, and I used this video to learn how to do the “circular tubular cast on” by littleturtleknits (this is the cast one suggested by the pattern).  This cast on is pretty fiddly, in my opinion, though.. and it just didn't look as smooth as I wanted.  I ended up switching to the German Twisted Cast On that I had just used for my Three Willows Cowl. I like the finished look of the German Twisted cast on better, and it is definitely less fiddly (but just as stretchy, in my opinion!!!)  I will probably make many more of these in the future!
 
Pattern #4:  One Cable Mitts by Valerie Teppo
Don't have the time for the more complicated cabling found in the Vancouver Fog mitts?  Try these!  Done 2-at-a-time via magic loop (with cables reversed, and the thumb gussets put into the correct spot for each glove), you can have these done in a day if you are diligent (and don't have any small children to distract you!)  The pattern calls for an Aran weight yarn, and as I only had worsted weight on hand, I had to make some modifications for fit.  I went with a size 6 needle, and that fit all of my recipients very well.  Also, I did three cable repeats before starting the thumb gusset, and the gloves were too short with the suggested amount of k2p2 ribbing at the end, so I ended up doing almost double!  As other Raveler's have noted, the increases for the thumb gusset seem to be reversed (doing them as suggested makes some large holes) so I did a M1R, then a M1L for the thumb.  This makes sense when you remember that M1R means that the increased stitch is leaning towards the right and that M1L is leaning towards the left. Now the increases follow the shape of the gusset. 
 
 
Pattern #5:  Montgomery Fingerless Mitts by Megan Goodacre
The last pattern I tried (because I loved the little eyelets) was this pattern by Megan Goodacre.  The pattern is sized for bulky yarn, so I altered it for worsted by using a size 6 needle, and casting on 32 stitches (my sister has small wrists, and I didn’t want to use a bulky yarn). I also knit several extra rows before starting the thumb gusset (to account for the differences in row gauge), as well as several extra rows after placing the thumb stitches on waste yarn - to make sure that my gloves would be long enough.  My sister was thrilled with these at Christmas, and they really turned out very sweet!
 
 
There you go!  A review of all of my preferred fingerless mitt patterns for 2012!  May the year 2013 bring many more chances to knit, and new patterns to try!


Saturday, November 24, 2012

Glove Love

Isn't it great having crafty friends on facebook?  Not only can you share your latest creation... but you can take inspiration from all of theirs, lol!  That's exactly what happened with my latest couple of projects.  Enter "Vancouver Fog by Jen Balfour".  I had picked up some lovely, hand-dyed superwash yarn in a detash on Ravelry, and using my favorite "cabling without a cable needle technique" by grumperina, I came up with these beauties (project info on Ravelry):


For this particular pattern, anytime the directions instructed to “slip stitches to a cable needle and hold them to the back” I used this part, and if it read to “slip stitches to a cable needle and hold them to the front”, I used this part. With this particular pattern, you are only holding at the most 2 stitches on a cable needle before knitting them, so the technique works out very well.
For example, in the pattern you do a
lpk – slip 2 stitches to cable needle and hold to front, p1, k2 from cable needle
I would slip 2 stitches purlwise (with yarn in back) onto my right hand needle, p1, and then with my left needle tip, I would insert the needle into the front of those two stitches I slipped, and pinching the base of the 3 stiches (the one I purled and the 2 I slipped) I would pull out my right hand needle altogether from those stitches. That leaves the 2 slipped stitches on my left needle and the one stitch I purled hanging in midair :) I put my right needle tip back into the hanging purl stitch, and then I knit those 2 stitches I slipped from the left needle to the right needle… and voila! lpk completed. If it is a right crossing instruction, you just repeat the process, but insert the left needle tip into the back of the stitches. Once you get the hang of it… it is so much faster than using a traditional cable needle (IMO, lol!)

After estimating my remaining yarn (with a glass half-full attitude, I might add!), I decided to try the Treads, a tipless gloves pattern by Victoria Anne Baker (also free on Ravelry).  I love the lateral braid that decorates these mitts, and by using this informative video (in English, instead of the reccomended video in German), I managed after an attempt where my braid ended up on the INSIDE of my mitt, to come up with the right pattern stitch!  However, I really did not have as much yarn as I had hoped, and so I couldn't complete the fingers and had to go with a ribbed, fingerless ending.
 
See how much yarn I had left by the end?  Here's the link to my project page on Ravelry, "Treading Lightly".


 I've never done gloves with fingers, or tipless fingers for that matter, though.. so I really wanted to knit this pattern again as written.  So... take 2 was knit up with a skein of malabrigo (809 Solis).. which was so buttery soft it was a joy to knit with!  This time the lateral braid worked like a charm.  It really is a fun addition to your stitch library!  (Project info on Ravelry)


What's next, you might ask?  Well... I have several skeins of that malabrigo left... so I think another pair of the Vancouver Fog are calling my name (and going straight into the Christmas Box!)  I really enjoy knitting with this yarn.  Here they are (more info on Ravelry):


Enjoy!

Wednesday, November 21, 2012

It's Beginning to Look a Lot Like......

Christmas!  Time to get that holiday sewing/knitting/crafting into high gear, lol!  And what better way to get into the mood than with some adorable holiday stitchery?  There's something about whipping up a batch of these guys that just makes me happy!


My favorite way to assemble these little guys is to trace my snowman design onto some high quality muslin with a pencil (you can always tape your design + muslin to a window to aid in this process), and then back the piece with some fusible fleece.  This hides my yarn tails, and gives me a sturdier piece to work with while I'm stitching the design.  For this project, I used the backstitch for outlining and words, satin stitch for the noses, and french knots for the eyes & mouths. 


After I'm done with the embroidery, I place the completed stitchery face down on a similarily sized piece of muslin, and stitch all the way around my completed snowmen (you can see the outline of the snowmen from the back because of the completed backstitch), leaving a 1-2" opening for turning.  After clipping corners and turning right side out, I then whipstitch the opening closed and add a thread loop for hanging.  Easy Peasy!


You too can stitch up a whole host of frosty goodness :)  The link to the free pattern is at the bottom of Samantha's Accessories blog, in the "Free Patterns" box... and the file name is "Free Snowman Stitchery Ornaments.pdf" 

In fact, these little guys make a good first project for a beginner (as demonstrated by my lovely daughter).  Once you get them started, everyone will want in on the action!


Tuesday, November 13, 2012

THIS is love :)

My hubby wanted two new hunting hats for his upcoming birthday (as well as his elk trip) and he requested the pattern Man Hat by Haven Leavitt for both (the same pattern I used to make the hat from my handspun).   He really likes this “Man Hat” pattern.. no fuss/no frills, and it fits him well.  Plus, it's reversible!


The green one is in bulky malabrigo (a joy to knit, and OH SO SOFT) and it knit up a lovely moss color.  I've never worked with malabrigo before... but I will definitely be revisiting this yarn again soon!


The orange one… well…. the orange one is from a thrift store 100% wool sweater I unravelled and dyed EYE-SEARING HUNTER SAFETY ORANGE with food coloring on the stovetop (quite the undertaking, I might add. That is love). The yarn started off cream, and I mixed up some “Orange Sunset” with yellow and red to get that shade, lol! It is knit double (in case there is a blizzard, of course). I’m pretty sure you could wear it as armor.  It practically stands up on its own, and he thinks it is PERFECT (what more can you ask?)


Carrie's Review?  This is an excellent, and well fitting pattern... (and free, I might add!)  The perfect go-to hat for the manly men in your life :)

Wednesday, October 24, 2012

Stripey Goodness

Oh yes... another sock blank.  I took the plunge and tried a slightly different dyeing technique than my first sock blank I blogged about here.  This time I knit my double stranded sock blank (using my knitting machine) approximately 90 stitches wide (instead of 60) and added a turquoise blue stripe all down one side.  The other 2/3 of the blank was dyed in various shades of pink and lilac.


I also decided that I didn't want to knit straight from the blank, so I placed two chair backs on either side of my blank, and reskeined both strands of yarn at the same time to avoid tangling.  It worked out very well, and I only had to let the blank dangle a couple times to avoid excessive twisting. 


I wound both skeins into center pull balls using my swift and ball winder, and then cast on for 2-at-a-time Magic Loop socks (64 stitches on size 1 needles).  I used the AfterThought Heel Socks by Laura Linneman pattern, and ended up with these beauties!


I love, love, love the way that the blue is carried as stripes through the whole of the sock, as well as the gradual shifting of the pink stripes to the purple.  It is so much fun to see how the blank will knit up after it is dyed that it is hard to put these down!  Here they are again modeled by my lovely daughter.


Next on the docket?  I'm thinking RAINBOW socks... dyed blank style!

Thursday, October 18, 2012

From Blank to Sock....

Look what I got :)  A new-to-me knitting machine!!  After a couple days of threading it wrong, and messing with the tension, and watching countless YouTube videos, I finally managed to knit up a two-stranded sock blank with some Cascade Heritage sock yarn.  I weighed the skein, and cut it into 2 identical balls, and just knit the two of them together at the lowest tension I could get away with.  This particular blank is 60 stitches wide, and I just knit until I ran out of yarn (took about 15 minutes, start to finish).  The red yarn is some waste acrylic to keep my live stitches from unravelling until I was ready.


Why am I so excited about a 2-stranded sock blank, you ask?  Oh.... because I wanted to use some of THIS!  Oh yes... let the dyeing COMMENCE!


Here's the whole process!  I soaked my blank in a mixture of tepid water and vinegar for about 3 hours (while I put all the kiddos down for nightime, lol).

 
While it was soaking, I mixed up my dye solutions in some small squirt bottles.  I used Wilton's icing gels for the color, and added a small amount of brown to each base color to deepen the undertones.  When I had my dye solutions prepared, I prepped my work surface by laying out several large white plastic bags, and then stretched a large piece of plastic wrap and layed out my blank (after spinning it in my salad spinner to remove excess water).  Then, THE FUN PART!  Using foam brushes, I painted on my chosen colors in chevron shapes (this helps the colors to blend as you are knitting).  To avoid white/uncolored spots in the yarn, it helps to stretch the blank slightly to get in between stitches, and also to mop up excess liquid to keep the colors from running/bleeding too much and becoming muddy. 
 
 
Once my design was complete, I used an old towel to mop up any leftover liquid (although, because I was using superwash yarn soaked in vinegar, all of my leftover liquid was clear as the dye was all in the blank).  Then, I wrapped my blank with the plastic wrap to make it into a tube, and coiled it into a into a tidy little package. To set the color, bring 2" of water to a simmer in a large pot with a vegetable steamer (or in my case, a piece of aluminum foil with holes poked in it) in order to keep your sock blank out of the water. Place your plastic-wrapped sock blank bundle in the rack and steam it for 30 minutes, timing from when the water reaches a boil. (I did have a lid on the pot, but took it off for photographs in the picture below)
 

After steaming for 30 minutes, turn off the burner and remove the pot from the heat.  At this point, you should let the sock blank cool in its plastic wrapping right in the pot.  If you open the hot plastic wrap before it has had a chance to cool down, you could get a steam burn (and those REALLY hurt). If you are like me, and want to cool your bundle a little more quickly, you can add it (still wrapped) to a bath of tepid water, and wait for it to cool.  At this point, open the plastic wrap and remove the sock blank in order to rinse it with lukewarm water until the water runs clear. I like to wrap my rinsed sock blank in a towel and then step on it to remove excess water, but you can also use a salad spinner, or your washing machine’s spin cycle to spin the remaining water out of the blank. Place your sock blank on a hanger and allow it to air dry. (It is best to do this over a towel, because water will wick to the bottom of the blank and drip off).
When your blank is dry, you can knit socks 2-at-a-time (I prefer top-down magic loop) directly from your blank:

 
And then be prepared for it to be hard to put this project down as you keep telling yourself, "Just one more color.....".  It really is quite fun to see the design unfold!  Here are my finished socks (with my first afterthought heel, nontheless, as I was trying to preserve the color striping -- I used
this tutorial by the KnitGirrrls)


I've got several more blanks waiting to be knit up, and I will be sure to share those as well!  Hope you enjoy dyeing some blanks of your own!