Tuesday, August 28, 2012

Knitting Chick

I have been having a lot of fun, lately.......not exactly knitting (per se), but rather sewing things to put my knitting INTO, lol!  This week's zippered, fully lined pouch features a little, googly eyed, "Knitting Chick" that I hand embroidered, using this line drawing that I drew on Inkscape.


I transferred the image to some natural colored muslin using a sharp pencil, and then embroidered it with some black pearl cotton using a stem stitch.  When I was all finished embroidering, I decided I wanted to add some color.........sooooo, I took out some color crayons and shaded the body yellow and the beak orange.  I covered the image with a piece of white paper, and then used my iron to heat set the color and soak up any wax.  I think it turned out great, and I will definitely use this method again in the future!

For the bag, I cut 2 strips that were 2" by 9" (the length of my embroidered piece) and sewed them with 1/4" seams to the top and bottom of the stitchery.  The back, and lining pieces were cut out at 8 3/4" by 9", and I fused a piece of fusible fleece to the back & front panels for extra padding to protect those delicate bamboo knitting needles.  The handle was cut at 3" by 14". To make the handle, you take your strip and fold in half lengthwise, and press. Unfold, and fold each raw edge into the center line you just created. Press. Fold in half again and press. Cut out a piece of fusible fleece 3/4" by 14, and fuse inside the handle, and then topstitch close to both edges.

The rest of the pouch was constructed similar to this tutorial at Skip To My Lou.  Here is my finished knitting project bag!

Front of Bag

Back of Bag

Inner Lining

Sunday, August 26, 2012

Simply Baby

I recently came into posession of a partially finished baby sweater by an older woman who was losing her eyesight. One of my relatives wanted it finished, so she could gift it to her first grandchild (due next month).

The pattern was in the bag with the extra yarn and the partially completed sweater… It was hand-typed on a scrap of yellowed paper, and I have not been able to find it on the internet anywhere (there are no credits on the pattern, either).

Normally, I prefer my baby patterns to be of the "Top Down, Seamless" variety... but I wanted to help her out, and the little sweater did not look THAT complicated, lol!  I am also not a fan of 100% acrylic yarn, and this little sweater is knit out of 3 Ply Jamie baby yarn, in a light green color:


I was also a little unsure on the seaming.. and even though I searched throughout Ravelry, and all over the internet, I could not find this pattern anywhere.  It really is a simple little pattern, however... knit all in one piece with seams to finish up the sides and underarms.  I also had to take out several rows where the poor older woman had started to have trouble with the stitches... but after a couple hours of work (and some gentle steam blocking) - it is all finished!


And just in case you are need of a simple little baby sweater pattern.. I retyped the original for you :)


Simple Infant Sweater:  (#8 or #9 needles – knit worsted yarn)
(Numbers in parenthesis are for lighter weight sport yarn)

Starting at lower back edge, cast on 40 (50) sts.  Work garter st. (Knit each row) for 6 rows.  Work in stockinette st. (knit 1 row, purl 1 row) to 7” from start, end with purl row.  Cast on 18 (24) sts. at end of last row for sleeve.  Turn, knit across, cast on 18 (24) sts for other sleeve.  Work on these sts.  as follows:  Row 1 – K5 for garter st. cuff, purl to last 5 sts., k5 for cuff.  Row 2- K across.  Repeat these 2 rows for 3” above sleeve cast on sts.  End on right side.

Work 31 (39) sts and slip to holder.  Bind off center 14 (20) sts. for neck, work to end.  Work on the 31 (39) sts. for 4 rows.  Inc. 1 st. at end of next row for neck edge, then inc. 1 sts at same edge every other row twice more.  Work on the 34 (42) sts for 2 rows.  Cast on 7 (9) sts at end of last row for front.  Next row, K5 for front garter st. border, purl to last 5 sts, K5.  Keep 5 sts at front border in a garter st.  Work until sleeve measure 7”.  End at cuff edge, bind off 18 (24).  Work to end.  Work on 25 (27) until front is the same length as back.  K6 rows for border.  Bind off.

Slip sts of other side to needle with point of needle at neck.  Join yarn and work across the 31 (39) sts.  Work 3 more rows.  Inc. 1 st. at beg. Of next row, then inc. 1 st. at same edge every other row twice more, end at cuff edge.  Work one more row on the 34 (42) sts, cast on 7 (9) for front.  Finish same as the other side.

Neckband – ON right side, starting at right front edge, pick up and K11 (13) sts, along neck.  Pick up and knit 14 (20) on back, and 10 (13) on other side.  Knit garter st. for 6 rows.  Bind off.  Sew up underarms.

Tuesday, August 21, 2012

Itty Bitty Bee

Yet another adaptation of the Teeny tiny knitted toys by Little Cotton Rabbits pattern... This time, a wee little bee :)  I started by casting on 13 stitches with the yellow (size 1 needles) and knitting 9 rows in stockinette stitch, and then switching back and forth between the black and yellow yarns (carrying the unused yarn up the side) for 2 rows at at time, ending with the black.  I made black I-cord arms and legs, and antennae, but the wings were a little more tricky.  To get the wing shape, I did this:


Cast on 5 stitches with the yellow
(1) K the first row across
(2) Kfb of first stitch, k across, kfb of last stitch

(3) K across
Repeat rows 2-3 until there are 13 stitches on the needle

(4) K2tg,  k across, k2tg
(5) K2, k2tg, k3, k2tg, K2

(6) K2tg k5 k2tg
(7) K2 k2tg k2

(8) K2tg k k2tg

Bind off the remaining 3 stitches and attach to back of bee body.  Repeat for other wing.

Here is Mr. Bee, in his element :)


I'd love to see a picture if you knit any little Itty Bitty Bees... so please feel free to share!

Sunday, August 19, 2012

Itty Bitty Kitty

Knitting up a present for a niece that is a cat lover, so I took the Teeny tiny knitted toys by Little Cotton Rabbits pattern and added some wee little whiskers, and a 3 stitch I-cord for the tail :)

And then there were three!


Little Miss Kitty also needed a little bed set for travel purposes.   I cut a 2 1/4 by 3 1/2 piece of felt for the bottom of the altoid tin, and then sewed a little pillow (2 3/4 by 4 inches, folded) and a little coverlet (2 pieces, 2 3/4 by 3 1/2, sewn together and then turned right sides out and top-stitched).
Hope she likes it :)


Saturday, August 18, 2012

Everybody Needs a Buddy

My four year old looked at Itty Bitty Bunny, and said, “Oh dear. He wooks so berry, berry sad…. He needs a fwiend! ‘Cause eberybody needs a buddy!” and thus… itty bitty bear was born. (Knit out of some 100% baby llama fromy my Craftsy Mystery Box that I couldn’t fathom what to do with… he is luxuriously soft!)


He is oh so soft to the touch, and infinitely poseable... I see many more "mini knits" in my future, lol!


Friday, August 17, 2012

Itty Bitty Teeny Weeny Bunny

The 2-at-a-time socks I have going on size 1 needles are going EVER SO SLOWLY,


 and I needed a quick little knit to experience the high of finishing something.... enter "Teeny Tiny Bunny" (FREE on Ravelry and here).  I had some "UN-ravelled yarn" from a recent foray to Goodwill in the cupboard, and it looked like the perfect bunny yarn.


Carrie's Review?  Very quick, and quite satisfying project. I love how the ears turned out (there is a k3tog in there that gives them their little cupped shape).  I also used a slightly nicer method for defining the head from the body (worked great!), as detailed here (scroll halfway down the page).


Here is the finished bunny (he is all of about 3" tall):


I added a tail by making a teeny little pom-pom (yarn wrapped around 2 dpns and then tied in the middle, fluffed and given a haircut with a pair of scissors).


I think one of these would be darling adorning a shower gift or card!

Wednesday, August 15, 2012

Teeny Tiny Tea Time Slippers

After a couple successful forays into the realm of felting... I am starting to feel a tad braver and decided to take on another project, "Tiny Tea Time Slippers" by Amy Munson.


My only choices for colorful, feltable wool in my stash however were bright orange, or neon blue.... so orange it was!

 This pattern was actually quite satisying.  I weighed my skein of yarn, divided it into two equal hanks, and then wound them both into center pull balls.  This pattern uses a mid-row bindoff to make the strap portion, and I used TechKnitter's tips for starting and ending a bind off in the middle of the row to avoid all of the little gappy portions you can end up with otherwise.  Her tips worked wondrously, and I was very happy with the result. 

Also, I used a circular needle for the "straight needle" portions, just because the flexible cable make it easier to get around the corners.  I made a size large, and they fit my daughter (age 4), with a little room to grow.  After one round in the washing machine (hot, low water with several towels), they felted up nicely and were ready for some embroidery and decorative buttons.  Here is E4 enjoying the finished product!  {E4} "OH!!!!  They are SO, SO, SO, SOOOOOO BERRY BEAUT-EE-FULL!!!"


Carrie's Review?  Try this pattern :)  All of the things that I like to see in a pattern were present (stitch counts, easy to understand directions, clear pictures...).  I think that these will make great Christmas gifts for all of the cousins. 

Saturday, August 11, 2012

Birthday Madness

Early August is a crazy time for our family... mainly because 3 out of the 4 kid's birthdays, PLUS our anniversary fall within the span of a week.  This year, the soon to be 11 year old wanted a "Tea Party" themed birthday with her friends, and after a week or so of planning, this is what we came up with!  The menu included:  Chocolate frosted cupcakes, Lemon Scones with Lemon Glaze, World Tea Lemon Cookies, and an assortment of Fruity Herbal Teas (with cream and sugar, of course!)


Wouldn't you know it, though.... the night before the party I went out to the storage area to retrieve the tea cups.... and then I remembered all those episodes of "HOARDERS".... Yep.  That's right... I donated all of those rarely used teacups to Goodwill.  Sooooo.... I had to make an early morning run BACK to Goodwill to purchase teacups (to the tune of $14!!!!).  That's what watching TV will get you, lol!


The party was definitely a hit, though!


I made up several sheets of Fairy Tea Place-Markers to set our tea table, and I thought someone else might be able to use them for their little girl's special day.  Simply print out, add the name, color and fold in half.   (Click the picture to download from dropbox)


Little brother also had a birthday party to attend today, which necessitated a gift for 8 year old cousin.  What to do...... Oh yes!  A drawstring pouch to hold his large collection of die-cast cars (with a couple thrown in for good measure).  I have been getting a lot of use out of this Lined Drawstring Bag tutorial these days!


Friday, August 10, 2012

Hoppity, Hoppity

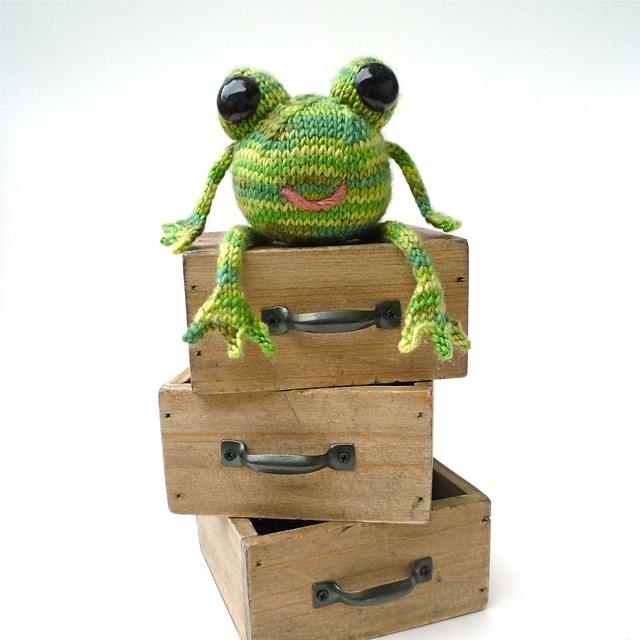
Browsing Ravelry the other day, I came across this darling little pattern:  Happy Frog by Emily Stoneking.  He just cries out to be knit... doesn't he, lol?


However, now that I have knit some softies using Susan B Anderson's techniques (see previous blog post), I REALLY don't like to make patterns where you have to make each of the different pieces to be seamed together at some later time (Because, let's face it... sometimes later never comes!)

So, first I started with the frog body (which is basically just a squashed round shape), and after stuffing it and tidying up my ends, I picked up the required number of stitches the pattern indicates right on the side of the body where I wanted the arm to be placed (using 2 dpns, which I then transitioned to 1 dpn for the I-cord).  This worked out fabulously, and I think added some strength and stability to the finished frog (which is important in a child's toy!)  I repeated this process with the other arm, and both legs.  The eyballs were a little trickier, just because I wanted them to have a slightly wider base.  For each eyeball, I picked up the correct number of stitches in a triangle shape with three dpns, and this helped make sure that the eyeball didn't end up attached to body in a skinny/floppy sort of way.

I used 15 mm safety eyes, plus a judicious amount of stuffing in each eyeball... and TA-DAH!  A finished froggie!

Frog Fronts:


 Frog Back:


Since Mr. Frog is destined to be a gift (if I can keep him away from K2 and S4 - my code names for some of the little ones), I wanted to dress up his presentation with a project bag (froggie themed, of course).  Using my favorite drawstring bag tutorial, I whipped up this little baby:


For more technical information, you can look on my Ravelry project page, here
 
After completing Mr. Frog v.1.0, I decided to knit another one out of some variegated Cascase wool I had leftover from another project.  This time I followed the pattern exactly as written, and knitted each piece to seam after completion.  Thus... Mr. Frog v.2.0 was born!


I hope you enjoyed these little hoppers as much as I did :).