Saturday, June 23, 2012

Magic Eight Ball - Ravelry Style!

I don't know about you, but I had never heard of a "Magic Eight Ball" or "Magic Yarn Ball" swap - but then again, I'm new to the world of swapping in general, lol!  Basically, it is a gift-filled treasure, made for another person that comes from the book The Children's Year (Hawthorn Press).

The gift giver wraps neat little treasures up in a ball of yarn, with a few of the beautiful gifts peeking out at the edges. As the recipient crafts with the yarn, the treasures fall out one by one, and they get to discover the fun as they knit or crochet.

I recently made one of these for the Ten Dollar Swap on Ravelry, and I thought I would show the gift from start to finish so that you can make your own Magic Eight Ball for a special friend!  First, start with something round-ish for the center, and begin wrapping one end of your yarn around the object.  I used a small knitted jingle ball that I had made for my recipient to give to her pet ferrets.


I continued on by adding another jingle ball and a ducky themed project bag and wallet I had sewn that I folded and rolled up very tightly around the ball. Anything your fellow knitter might appreciate (such as a tapestry needle, a few point protectors, special stitch markers or knitting notions) would be perfect for your Magic Yarn Ball.


Keep wrapping and adding objects and watch as your Magic Yarn Ball grows bigger, and bigger!


At the end of the ball, finish with a few lovely objects that will show, and secure the yarn end.  Here is a glimpse of my finished ball, as well as picture of all of the goodies that I included for my intended recipient based on her likes and dislikes (before wrapping them in the yarn!)


In return, my swap partner sent me this wonderful goodie package!  Here’s a first glimpse as I opened the box:

A beautiful blue project bag from the pattern, Bag! You’re It!, blue dangly stitch markers packaged with an orange accent ribbon as well as a package of my preferred flavor combination (PB & Chocolate) and a lovely gourmet coffee “Hazelnut Cream”, and a collection of nicely packaged sea shells and shark’s teeth collected for my children (that she had thoughtfully BOILED! Thank you, thank you, thank you, lol!)


Next came two MORE coffee selections, “Caramel Latte” and “Sven’s French Roast” (yum... I love coffee!)...

and then my ball finished with some Peach Citrus hand lotion, two packages of blue buttons, a yummy sounding recipe from a place she had recently visited for “Door County Cherry Muffins” and a package of Wilton’s Buttercup Yellow icing coloring so I can do some more dyeing experiments :)

The whole wonderful package was wrapped with a skein of Washable Ewe in the Duckling colorway (which is kind of funny because of all the duck themed goodies that I included in my package, lol!)


Here is a close-up of the beautiful bag full of my thoughtful, personalized goodies…


I hope that my swap partner has as much fun unwrapping this ball as I had putting it together (and that you share a Magic Eight Ball with someone special as well!)

Sunday, June 3, 2012

Feltable

Felting that little monster change purse was so much fun... I decided I needed to knit up something else that could be felted!  I wanted to knit a little credit card sized wallet that I could haul around in my purse (in my favorite color, of course)... but after much internet searching, I couldn't find anything that was quite right..

So, enter my very first pattern (lol), the "Felted Embroidered Wallet".  It took some doing to figure out the construction and design aspect, but I persevered.  I knit up two samples (one from the same yarn I unravelled to knit the coin monster here, and the purple from a previous unravelling attempt).


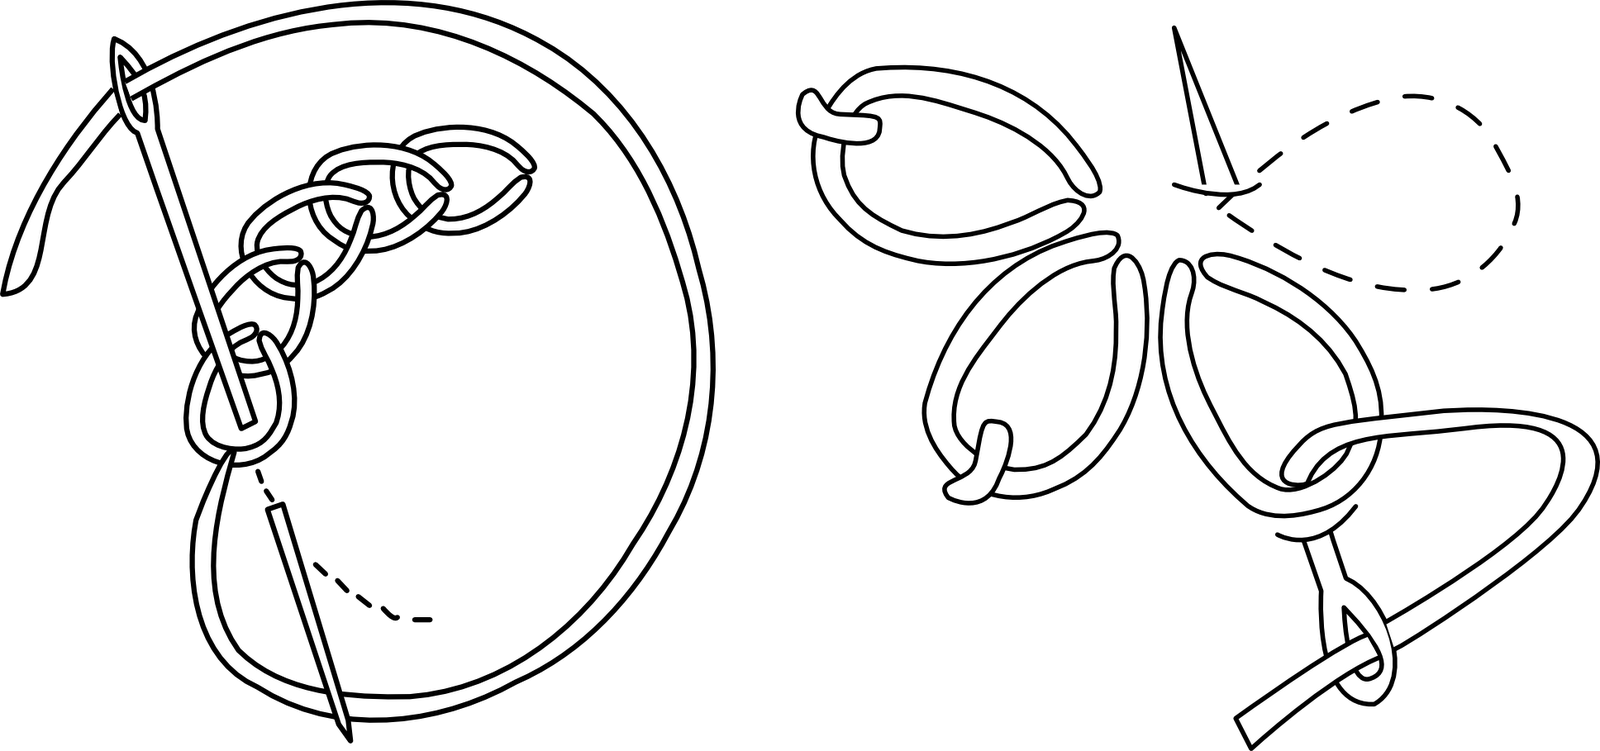
I also had to sit down with my vector drawing program, and figure out how to illustrate the embroidery stitches and placement... so I came up with these little drawings to include in my pattern:


After several attempts, and some math, I uploaded my first free pattern to Ravelry:

and here are the finished pictures:


Recycled Monster

I love getting mail on Ravelry..... it's almost as much fun as getting "real" mail in the mailbox, lol!  But this time, I received a lovely suprise from Betsy (enw001) for sharing my "Un-Raveled Ball Bands" --The "Coin Pocket Monster Fish" pattern from my Ravelry queue!


I couldn't wait to get started :)....... and I had the perfect, feltable wool yarn that I had just reclaimed from this Abercrombie and Fitch sweater (another Goodwill find!)


Besides... it has been the week of disapointing knitting (you know... the kind you are all excited about at the start... and then as it progresses, you realize how it just isn't turning out quite the way you had envisioned), so I needed some "knitting therapy reinforcement".  This cute little guy turned out to be just the thing!

Here he is, pre-felting (kind of looks like a big-mouth frog... doesn't he?)


As for the felting... well..... let's just say that I have never felted anything before (on purpose), and I wasn't quite sure how long this whole process was going to take.  Per the pattern directions, I decided to do it by hand in a bowl of soapy water.  I had to leave it alone for just a second, and this is what I found when I came back to the table;


Everyone wanted in on the action, lol!  Luckily, this was something where a lot of swishing, rubbing, and dunking was EXACTLY what I needed, so my little helpers had a blast!

Putting that zipper in wasn't exactly a picnic either... but I finally prevailed, and here is the finished product (modeled by another of mommy's little helpers!)


Sunday, May 27, 2012

Triple the Fun!

I found out on Monday that I needed a shower gift for a upcoming baby shower on Memorial day.. and then they told me it was a TRIPLE baby shower.  Eeek!  I was starting to panic until I remembered the Wee Ones Craftsy Class I blogged about here.  Aha!  Problem solved!  I pulled out some of my favorite baby yarn (Martha Steward Extra Soft Wool Blend) and got to work. 

I decided to make one each of the bunny, elephant and hippo:


and while they were certainly cute... they just seemed to need a little something extra to make the gift complete, lol!  So I took a look at the nearest fabric store and came home with these three fabrics:


To turn into these, following the lined drawstring bag tutorial I blogged about here.  I also printed off some of my free "Knitting Gift Tags" to attach to each package.


I was also browsing my local Goodwill for some sweaters to unravel, and came up with the idea of including a board book that fit with each individual animal to include in the gift... so here are my completed gift packages!


I hope that this inspires you as well.. in case you have any gift giving in your future!  Here's hoping all of the intended recipients fall in love with them as well :)


Saturday, May 26, 2012

UN-ravelled

un·rav·el

[uhn-rav-uhl] verb, un·rav·eled, un·rav·el·ing or ( especially British ) un·rav·elled, un·rav·el·ling.
1. to separate or disentangle the threads of (a woven or knitted fabric, a rope, etc.).

My first attempt at unravelling a sweater and recycling some yarn! There are quite a few tutorials out there on the internet these days, and here is a summary of what I have learned about the process (in case you want to try one of your own!)  The first step, of course, is to find a sweater (or two) to unravel. The main things to consider are:
  1. Weight: There are lots and lots of sweaters out there made from very fine yarns, which can be quite difficult to take apart. For my first attempt, I looked for worsted, and sport-weight yarns.
  2. Fiber content: I only wanted sweaters with natural fibers because (in my opinion) it is just not worth the time or money for acrylic, so be sure to read the tags. If there is a small percentage of nylon or acrylic, it will be less breakable and therefore easier to unravel, so a little man-made fiber content might even be preferable!
  3. Condition: It seems as if many wool sweaters end up in the thrift store because they were accidentally tossed in the washing machine, and a felted sweater will not unravel; an unfelted sweater will have a clear outline of each individual stitch, and you will be able to see through the fabric when it is stretched.  Also, be on the lookout for stains or holes that might affect your finished yarn.
  4. Seams: To get long lengths of usable yarn, your sweater must have sewn or crocheted seams (rather than serged). The easiest sweaters to unravel have crocheted seams (you will see a small crochet chain up one side of the seam).

 I chose to start my un-ravelling adventure with a 100% wool, purple sweater, and a Fair Isle cotton/nylon/wool/angora blend in a beautiful red/orange color.


 First, I turned the purple sweater inside out, and looked for the chain stitch along the arm seams.   What is a chain stitch, you ask? A chain stitch is the use of 1 or more continuous threads (no bobbin) to create a stitch. The chain stitch can be easily pulled out by pulling the right thread (like a potato bag). Taking apart good seams pictured above can be very fast and easy. If you start at the right end, undoing the seam is as easy as pulling on the yarn end - the seam comes apart like magic.

 After "unzipping" the arms, I did the armholes, and the neck band, which left me with four, separate pieces to start unraveling. To unravel the sleeve, start at the shoulder end and try and identify where the bind-off ended. You might have to make a couple of snips to get at a yarn end. When you find it, and start pulling, you will see the "live stitches" that every knitter can identify! At this point, I placed the yarn end in my ball winder, rolled the piece to unravel into a tube (so it could unwind more evenly) and started cranking away at my ball winder. It is very, very satisfying to see the piece unravel into lovely yarn right there in front of you!  If you need more information about any of these steps, I found this blog post to be very helpful!

I unraveled the red sweater in a similar manner, but it was a little more complicated because of the Fair Isle portions of the sweater. However, I was able to do both sweaters in a couple of hours. At this point, I was left with this:


Now you will have several balls of yarn, and you are ready to turn them into hanks for washing and stretching. If you have a niddy noddy you are all set... but for the rest of us, a couple of chair backs work just fine. I count the number of times I wind the yarn around and multiply that number by the diameter of the chair backs to calculate my total yardage. At this point, you can tie the ends of your yarn in a figure eight to hold them, and then add several more figure eight ties around the hank to keep it from getting tangled.


Now you will be left with several large, very kinky hanks of yarn that are ready to be washed and stretched! Fill a sink, tub, or large bowl with warm water and some wool wash or mild dish soap and stir. Gently push the yarn down into the soapy water (avoid using hot water and any agitation so that no felting will occur) and then let the yarn soak for at least 30 minutes.

After soaking, rinse the yarn with room temperature water, gently squeezing out the excess water. You can then roll the yarn up in a towel and apply pressure to get out some more moisture, or use your salad spinner :). Extra kinky yarn needs to be stretched to help straighten it out. I hung my hanks up on plastic coat hangers with a "canned food" weight to help stretch them out as they dry.


Once your yarn is completely dry, it is time to ball it back up by either placing it back on the chair backs to re-wind, or using your swift and ball winder. Since your recycled yarn does not have a ball band, make sure you label it with your fiber content from the garment label, and your calculated yardage (because you will not remember in 6 months.... trust me!!)  In case you are wondering, the total yardage for the purple wool was about 1200 yards... not bad for $4.99!


I also whipped up some of these yarn labels so I can keep all that pertinent information with my yarn.. feel free to use them for your own, non-commercial purposes :).  Just click on the picture to download the .pdf file from DropBox.

Tuesday, May 22, 2012

Blue-ish

Another foray into the murky art of dyeing your own yarn... this time with Kool-Aid!  Three packets of Mixed Berry Kool-Aid to be exact!


I used the same yarn as with the Easter Egg Dyeing Experiment, the Red Heart & Sole with Aloe.
 I wanted to try dyeing a self-striping, graduated color this time so I wound the skein around three chairs (wrapping each chair 5 times before moving onto the next chair), and I continued wrapping each chair 5 times until I ran out of yarn.  I cut twelve small pieces of yarn to use as figure-eight ties, to make sure I would be able to untangle my mini-skeins after I was done dyeing the yarn.  I made sure to tie my figure-eight ties loose enough that the dye would be able to easily penetrate underneath the tied area.   


When my yarn was all tied up, I slipped the mini-skeins off of the chairs and let the whole thing soak in some luke-warm water for 30 minutes while I prepared the dye bath.  The dye bath, of course, was insanely simple to make... just dissolve three packets of Mixed Berry Kool-Aid in about 4-6 cups of water, and let the bath come to a simmer.

After the yarn was done soaking, I just squeezed out the excess water and dipped all three mini-skeins (still attached to each other) into the simmering dye. I immediately removed the first skein & left the next two to soak about 3 minutes, removed the 2nd skein and left the last skein to soak about 5-6 minutes, and then removed the whole thing to rinse, pat dry, and reskein into one big skein for a final hang to dry.

So, here is my first attempt at Kool-Aid dyeing; I'm going to call it “Blue-ish” :)


One skein of Red Heart & Sole is more than enough yarn for a pair of toddler socks, and so I set to work to improve little E's wardrobe :)  Here she is modeling her latest pair (I love the way the stripes came out!)  Here is the Ravelry link as well!